


Pocket Hole Jig Kit – Woodworking Drill Guide
Less guesswork.
More making.
Adjustable Pocket Hole Jig Kit
Guide your drill. Position your joints. Bring your next woodworking project together with a jig that makes angled drilling easier to control.
Adjust. Clamp. Get to work.
Move the guide assembly to the required height, use the marked scale as a positioning reference, and tighten the adjustment knobs. The screw-operated clamp helps hold your workpiece against the jig during drilling.
A practical setup for repeat hole positioning across matching project parts.


A clear path for your drill bit.
Two guide openings help direct the bit for pocket hole drilling. The removable guide assembly gives you another positioning option when working on a larger component.
When using the guide separately, secure it to the workpiece with a suitable clamp before drilling.
Make the join.
Keep the clean look.
Place pocket holes on the inside or underside of suitable assemblies to keep screw heads away from the surfaces you want to show.
Build the framework.
Prepare pocket screw connections for suitable cabinet frames and components.
Bring your ideas together.
Use pocket hole joinery where your furniture design calls for screw-fastened joints.
Make something useful.
Work on frames, small storage projects and everyday workshop builds.
More than the jig.
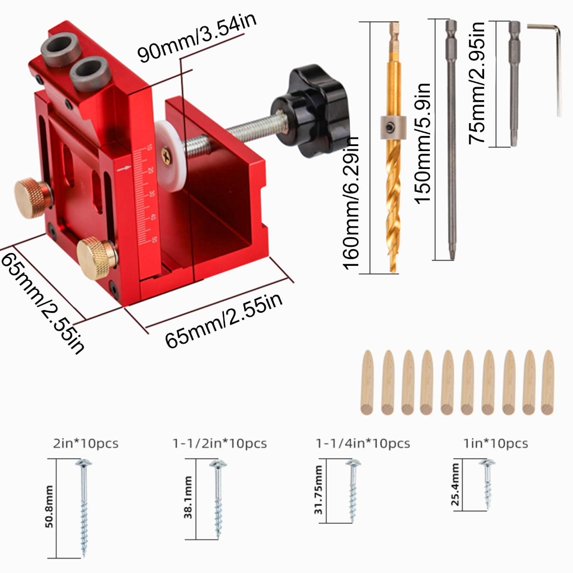
The product image shows a stepped drill bit with a stop collar, two driver bits, a hex key, pocket hole plugs and four screw lengths.
- Stepped drill bit: 150 mm / 5.91 in
- Driver bits: 150 mm and 75 mm / 5.91 in and 2.95 in
- Screws: 1 in, 1¼ in, 1½ in and 2 in — 10 of each
Accessory details are based on the pictured kit. Check the selected package contents before ordering.
Know your setup.
| Product | Adjustable Pocket Hole Jig Kit |
|---|---|
| Purpose | Guided angled drilling for pocket screw joinery in wood |
| Guide openings | 2 |
| Adjustment | Sliding guide assembly with locking knobs and marked scale |
| Clamping | Hand-operated screw clamp |
| Jig dimensions shown | Approx. 90 × 65 × 65 mm 3.54 × 2.56 × 2.56 in |
| Stepped drill bit length | 150 mm / 5.91 in |
| Driver bit lengths | 150 mm and 75 mm / 5.91 in and 2.95 in |
| Screw assortment shown | 40 total: 10 each of 25.4, 31.75, 38.1 and 50.8 mm 1, 1¼, 1½ and 2 in |
| Other accessories shown | Drill stop collar, hex key and pocket hole plugs |
| Colour | Red body with black and gold-tone controls |
Dimensions are taken from the product diagram and are approximate. Inch equivalents are rounded from millimetres; the source image contains an inconsistent inch label for 65 mm.
Set up for your next joint.
- Match the setup to your stock. Check the board thickness and select the appropriate jig setting, drilling depth and screw length.
- Secure the workpiece. Tighten the jig and check that the board cannot shift.
- Drill the pocket holes. Use the stepped bit and stop collar, clearing chips as you work.
- Align and assemble. Clamp the joint faces together and drive suitable pocket hole screws.
Make a test joint in scrap of the same thickness before drilling your project pieces. A drill/driver is required and is not shown as part of the kit.
Helpful answers.
What does a pocket hole jig do?
It guides a stepped drill bit at an angle to create a recessed pocket for a screw head. The screw then joins the drilled piece to another piece of wood.
Can I adjust the guide height?
Yes. The pictured jig has a sliding guide assembly, marked scale and locking knobs for height adjustment.
Can I hide the screw heads?
Plan the hole placement on an inside or underside surface. Pocket hole plugs can help cover the pockets where appropriate; the final appearance depends on the wood and finish.
Which screw length should I choose?
Choose a screw length and thread type suited to the actual board thickness, material and joint design. Test the setup on scrap first to avoid the screw breaking through the opposite face.
Build something
worth keeping.
Controlled drilling. Thoughtful joints. A more satisfying day in the workshop.